
Reference: Common Workbook Actions and Usage Notes
These notes provide important reminders about day-to-day actions, and describe how to use
features in Worksheets that differ from those in other spreadsheet applications.
Action | Notes |
|---|---|
Copy a workbook | In the workbook, select . If you have adequate
permissions on a workbook and you copy the workbook, you can see the
same data as the workbook owner, including Workday data. However, if the
copied workbook contains live data from a Workday data source, then as
soon as you refresh live data in the workbook, you see only the data you
have access to. If you don't have access to one or more of the data
source fields, an error occurs when you refresh live data. |
Use full-screen mode | Full-screen mode hides the Workday header to display the maximum possible number of workbook rows. To enter full-screen mode, select . To exit full-screen mode, press Esc or select . While in full-screen mode, to exit from dialogs, such as the Print dialog, press Alt+`
. Workday doesn't support full-screen mode in the Safari browser. |
Recover a workbook from the trash | From Drive, select Trash . Select the row containing the workbook and
then click the Restore icon. Workday places
restored workbooks in the Drive home view.If you remove a workbook that was shared with you (you don't own it), you remove yourself
from the list of shared users. The workbook disappears from Drive and it
does not display in the Trash folder. |
Rebuild a corrupted workbook | If a problem, such as a system error or an interrupted process, causes a
workbook to be corrupted, you can return the workbook to a working state
using a keyboard shortcut:
|
Use keyboard shortcuts | Many shortcuts are the same as other spreadsheet products, but because Worksheets is
browser-based, several are different. See for details; select to view all the shortcuts in a printable format. Keep in mind that keyboard shortcuts are intended for use with US English
keyboards. Results might vary with different keyboard layouts. |
Undo and redo your changes | To undo a change, select or press Ctrl+Z (Windows) or Cmd+Z (Mac). To redo a change, select or press Ctrl+Y (Windows) or Cmd+Y (Mac). Worksheets tracks your most recent 15 changes that you can undo. You can't undo some actions, such as deleting a sheet. If you select to do one of these
actions, a confirmation message displays; if you continue with the
action, the tracking of your changes resets to that point. You can't
undo changes that occurred before this one, unless you previously
created a workbook version. Keep in mind that another person editing the workbook might do an action
that resets change tracking, which prevents you from undoing your
change. You can't undo changes to workbook comments in the Comments panel, and
reverting to a previous version doesn't restore comment changes. We recommend creating a workbook version () before doing any of these actions, which can't be
undone:
|
Hide and unhide rows, columns, and sheets | To hide rows or columns in a workbook sheet, select the rows or columns to hide, then
right-click and select Hide . To unhide, click the
< > indicator.To hide a workbook sheet, select the triangle icon on the right side of the sheet (tab) to
open the menu, then select Hide . To unhide, click
the triangle icon  at the bottom right of the workbook to
display a list of all the sheets, and then click the hidden sheet.
Hidden sheets are indicated with a crossed-out eye icon at the bottom right of the workbook to
display a list of all the sheets, and then click the hidden sheet.
Hidden sheets are indicated with a crossed-out eye icon  . . Hiding content is not a
security mechanism. Users with Can View permission for a workbook can
use external references to display and use the workbook's hidden
content; additionally, they can copy the workbook and unhide any
content, if you enabled the Commenters and viewers can copy,
download, and print option. |
Filter content |
When you apply a filter, it's applied to that specific dataset. The filter doesn't reapply
if the dataset changes; you need to remove and re-apply the filter. |
Sort columns or rows | Select the columns or rows to sort, then select and then choose a sort order or select
Advanced Sort . To use Advanced Sort:
By default, if your workbook sheet contains live data and you select
Advanced Sort , Worksheets selects only the live data area for
the sort. If you want to include additional columns in the sort,
highlight the entire range that you want to sort before selecting
Advanced Sort . |
General sorting guidelines | General guidelines include:
|
Sort, when formulas operate on cells that contain references | To keep row data together when sorting, always use absolute cell
references (precede references with the dollar sign ($) character) in the
cells that contain cell references. Otherwise, sort results are
unpredictable and row data does not stay together. |
Paste content into a workbook | You can use Ctrl+C and Ctrl+V to copy and paste content as values from a desktop
spreadsheet application such as Microsoft® Excel® into a workbook, or from one
Worksheets workbook to another. However, you can't use the menu option to paste desktop application content into a workbook;
Paste Special works only between workbooks that reside in Worksheets.
You must upload and convert the desktop spreadsheet into Worksheets by
selecting before you can use . The limit when pasting content from one workbook to another is 9 MB. |
Rename a sheet | Click the arrow on the sheet tab to rename the sheet or to do other
sheet actions. Sheet names can be up to 31 characters long. We recommend
using names of 27 characters or less, because when you copy a sheet,
Worksheets uses 4 characters to add a space and a numerical increment in
parentheses to the sheet name. For example, when you copy the sheet named
My Sheet , Worksheets names the copy My Sheet (2) .
|
Open instance details in a new browser tab | When working with live data in a workbook, you can click to view instance details
where applicable. To open the instance page in a new browser tab, select the
icon in the instance link or use Ctrl+Click (Windows) or Command+Click
(Mac). |
Auto-fill a formula or value into all cells in a column | You can use a keyboard-based alternative instead of drag-fill:
|
Freeze spreadsheet cells | Drag a freeze handle from the top left corner of the sheet to freeze columns or rows. 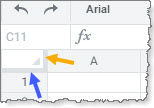 Alternatively, you can scroll until the desired column or row is in the first viewable
position in the workbook, then freeze at that position by selecting . Worksheets freezes at the location of the first visible
row in the spreadsheet, which might not be row 1. Similarly, selecting freezes at the position of the first visible column in
the workbook. To unfreeze all columns and rows, select . |
Define custom cell formats | If you have special requirements for formatting numerical data in a cell,
you can use . Worksheets supports the same formatting codes as other
popular spreadsheet products. For example, if you want to always display
3 digits to the right of the decimal point in a cell, use the custom
formatting string #.000
|
Find text in a sheet | Select to open the Find in Sheet panel and search for text on a
workbook page. |
Break a line in a workbook cell | Double-click the cell in which you want to insert a line break. Click the
location inside the selected cell where you want to break the line.
Press Alt+Enter (Windows) or Option+Enter (Mac). If you use the workbook formula editor, it removes line breaks, so you
need to add the breaks again. |
Change a sheet's tab color | In the sheet menu, select Tab Color and then
choose a color. |
Change a workbook's font | Worksheets supports a variety of widely available fonts. The default
workbook font is Roboto. Keep in mind that Worksheets doesn't support the
Calibri font. |